Target Audience: Testers and QA
Purpose: Tutorial
The advantages of this approach with these tools:
- Javascript is a common, easy to learn and easy to understand language with a large amount of support. Javascript developers can help any testers with any part of the testing.
- Selenium is a common testing tool for QA and an industry standard. You will not lose any knowledge switching from Java or any other tool you use Selenium in. We use the same web-driver and it behaves in the same way.
- Operations can use any testing scripts you may write in the pipeline while building software to test it before building for production, code a QA engineer creates can be directly incorporated into a pipeline.
- It’s simpler code and easier to understand javascript, especially with async/await (more on that later)
Building a simple project
We will need these prerequisites:
⚠ I’m not going to cover installing node, or a code editor, this is up to the reader. You should also have a basic knowledge of the command line, navigating folders and making files and directories. If you struggle with any of these basics then you’ll generally struggle with the tutorial.
Finally, before we get started, know that this tutorial is for Mac. This will work on windows, but this is also for the reader to discover and overcome.
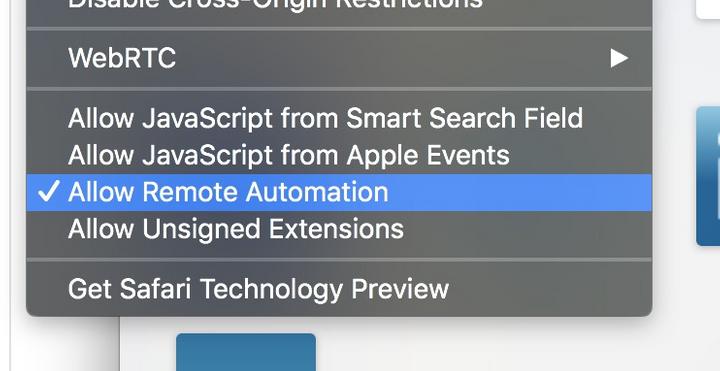
ℹ To enable testing in safari on the mac, enter your preferences and enable the developer menu, then in the developer menu enable 'Allow Remote Automation'


Create a Project Ready for our Tests
We need a folder to keep our project in.
mkdir selenium-tests cd selenium-tests
Lets create a package.json file
After you have installed node you will find some new commands available your terminal/command line. This one creates a project in a folder ready to install packages.
npm init
This process will ask you a series of questions. For now, you can either fill them in, or press enter to skip them until it returns you to the command-line.
We are going to need to install some packages
npm install selenium-webdriver chromedriver geckodriver mocha
We need a file to run our tests. Lets create an empty file in our project.
touch index.js
This will create a blank file called index.js
Lets make sure everything is all there.
ls
This is what we should have:

Looks similar? OK! Lets continue…
Executing a Javascript File in NodeJs
Open your index.js file in your favourite code editor and add this code:
console.log('I LIVE!');
and press save.
Now in your console, type this:
node index.js
We should get this:

If something else happened then something is wrong, retrace your steps and discover your issue.
Setting up a Test Shortcut Script
We need to add a shortcut to our package.json to run this script quickly. Open your package.json in your editor and edit this line:
"test": "echo \"Error: no test specified\" && exit 1"
To say this:
"test": "mocha --recursive --timeout 10000 index.js"
Now, when we type:
npm run test
Our tests, will run.
Creating Our First Test
Back in our code editor, delete the console log and paste this:
let browser = 'chrome';

describe('Go to google and search with ' + browser, function () {
    let driver;
    before(async function() {
        driver = await new Builder().forBrowser(browser).build();
    });
    it('Searches and returns results', async function() {
        await driver.get('http://www.google.com/ncr');
        await driver.findElement(By.name('q')).sendKeys('webdriver', Key.RETURN);
        await driver.wait(until.titleIs('webdriver - Google Search'), 1000);
    });
    after(() => driver && driver.quit());
})
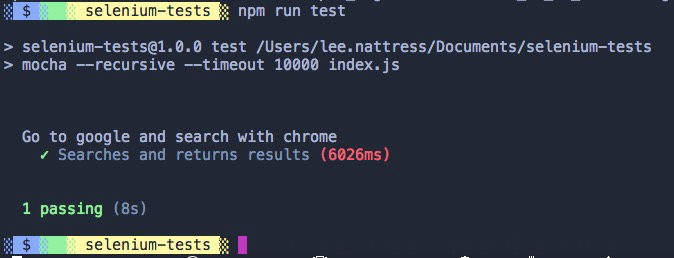
Lets run this test by calling our shortcut script
npm run test
Our test should run in chrome:

Running This Test in Multiple Browsers
We need to run this same test across many browsers to ensure compatibility.
At the top of index.js we require ‘selenium-webdriver’. Directly below that, we define the browser:
let browser = 'chrome';
Lets make that an array of browsers:
let browserList = ['safari', 'chrome', 'firefox'];
Now lets loop over this list and do the test for each one:
browserList.forEach((browser) => {
    //Whatever we put in here runs as many times as there are browsers.
});
It’ll look something like this:
const browserList = ['safari', 'chrome', 'firefox'];

browserList.forEach((browser) => {
    describe('Go to google and search with ' + browser, function () {
        let driver;
        before(async function() {
            driver = await new Builder().forBrowser(browser).build();
        });
        it('Searches and returns results', async function() {
            await driver.get('http://www.google.com/ncr');
            await driver.findElement(By.name('q')).sendKeys('webdriver', Key.RETURN);
            await driver.wait(until.titleIs('webdriver - Google Search'), 1000);
        });
        after(() => driver && driver.quit());
    })
})
Run all the browser tests with:
npm run test
After the browsers pop up and do their thing, you should have this:

Success!
Homework
- If you are on Windows, you wont be able to use Safari, but you can test in Edge and IE. See if you can get your test running in Internet Explorer.
- Can you test something with a form? How about log into something you know the details for.
- Can you make a test that only runs for a specific browser?
- In the google search test above, can you click on a results link and check if we are on the correct page?
- Can you add chai assertions into this code?
- Can you use this type of test in your application?
- Can you run these tests headless without the browsers popping up all over the place?
- Do you understand how to use this test in your build pipeline?
- How can we test mobile devices using automation?
Further Reading:
https://mochajs.org/ - https://www.chaijs.com/ - https://www.seleniumhq.org
